Showing posts with label Nom noms. Show all posts

Sunday, July 22, 2012

The BEST Apple Pie Recipe

I may have found the perfect combination of recipes for the best apple pie on the planet!  I tend not to bake a whole lot since we've moved, since it's just the two of us, but I couldn't say no this time.  

Poor hubby had a bad week...It began on Sunday night with a trip to the E.R., and then a business trip the next day.  So when he requested an apple pie (with big, sad puppy dog eyes), I gave in.  While pies can be a lot of work, this one was worth ever second spent prepping.  

I can't take credit for these...I found them searching Google- "Best Apple Pie Recipe" With almost 5,000 5-star reviews, I had to give Apple Pie by Grandma Ople a try (find the original recipe here).  I did add a few twists/ingredients of my own, and I thought the finished product was stellar. 

But before you jump into all that buttery, sugary goodness, you need a good crust recipe.  Sadly, Grandma Ople didn't include one on the All Recipes site.  I got this one from Simply Recipes, and it was gooood.  

This pie crust recipe is shown on Simply Recipes in a food processor, but I don't have one.  Here's my version:

2 1/2 cups all-purpose flour, plus extra for rolling
1 cup (2 sticks) unsalted butter, very cold, cut into 1/2 inch cubes
1 teaspoon salt
1 teaspoon sugar
6-8 tablespoons ice water

-Combine flour, salt and sugar in a large bowl.  Whisk or sift together to incorporate ingredients.
-Add butter cubes, and mix in with pastry cutter until mixture resembles course meal (with pea sized pieces of butter).
-Add ice water 1 tablespoon at a time until the mixture begins to clump together.  If you pinch some of the crumbles and it holds together, it's ready.  If not, add more water until it does.
-Pour dough onto a very lightly floured counter and smoosh together any crumbly pieces with the palm of your hand.  (This also helps create the flaky texture once it bakes.)
-Shape dough into two disks, wrap in plastic wrap, and refrigerate for at least 1 hour.

To roll out the dough, I always find that it's easier to roll it between two pieces of waxed or parchment. I lightly flour the insides of the waxed paper, and add my dough.  I let mine thaw a little on the counter before I started rolling because the refrigeration made it a little hard.  

Once rolled out to about 1/8 inch, I put one piece into my pie dish (a 9 inch stoneware dish), and cut the other into strips for the lattice top with a pizza cutter. 

For this particular recipe, it's easier to go ahead and have the lattice pieces ready to go.  The pie recipe is a little unusual in that you add the apples to the dish, put the lattice on top, and then pour hot pie filling OVER the lattice.  Trust me...it's delicious.  

The "Apple Pie by Grandma Ople" called for all Granny Smith apples, but I didn't have that many on hand.  I ended up making some changes to her original recipe, but I'm itching to try this again as written.  Here's my version of the pie filling:

1/2 cup unsalted butter
3 tablespoons all-purpose flour
1/4 cup water
1/2 cup white sugar
1/2 cup packed brown sugar
8 apples
dash of cinnamon
dash of vanilla extract 

(I like tart apples in my pies, so I used a few Granny Smith, Jonagold and Jazz Apples.  I personally think the more variety you have in the apples, the better your pie will taste.  I'm curious to try it with just the Granny Smiths though.)

-Preheat your oven to 425 degrees.  Melt the butter in a saucepan.  Stir in flour.  Add water, white sugar and brown sugar, and cinnamon and vanilla extract to your liking.
(We like a LOT of cinnamon in our house.  I didn't measure, just eyeballed, but start with a teaspoon to see where your flavor is at.  I'd say the same for the vanilla extract.  I just wanted a little extra warmth in the filling, so I added a literal dash.  I took a spoon and tasted the filling to make sure these extra flavors were in check).
-Bring mixture to a boil.  Reduce temperature and let simmer.  
-Fill prepared pie dish with apples, mounded slightly.  Cover with lattice top.  Gently pour the sugar and butter liquid over the crust.  Pour slowly so that it does not run off.  
-Bake for 15 minutes at 425 degrees.  Reduce the temperature to 350 and continue baking for 35-45 minutes until apples are soft. 

If you've never made a pie like this before, beware of the dreaded oven drips.  While your pie is a-bubblin'-and-a-bakin', the deliciousness from the inside of the pie will sometimes spill over the top.  It ends up hitting the bottom of your oven, burning, and filling your entire house with a smoky haze.  I put a cookie sheet below my pie while it's baking, but found that I still got the smoke.  While there wasn't burned sugar glued to the bottom of my oven, I still wasn't a happy camper.  

So I baked the pie for the first 15 minutes with a dry cookie sheet under it.  (Because I wanted the crust to get nice and crispy brown).  When I reduced the temperature, I put a little water in the cookie sheet.  This helped the smoke problem a LOT!  Because I didn't want the excess moisture to make my crust soggy, I took the water out and replaced it with a dry cookie sheet for the last 10 minutes of baking.  The pie came out perfect!  

The hubster was a happy camper, and I earned some major brownie points for making something delicious!  Both of these recipes are keepers!

Friday, May 25, 2012

Balsamic Glazed Salmon


 I can't even begin to describe how much I LOVE this recipe.  Like wanna-eat-it-two-times-a-week love.  The tangy balsamic reduction is delicious with the buttery taste of the salmon.  It was perfect for our anniversary dinner tonight with some of our favorite summer sides.  It would be amazing paired with a lightly flavored pasta, potatoes, a bed of veggies or rice...I could go on and on.

But let's begin, shall we?


Start with enough salmon for everyone to have at least one 3oz serving.  i.e. the size of a deck of cards.  But let's be serious, men like my hubby generally take a little more than that.  #1 rule of an Italian kitchen, ALWAYS overestimate the number of servings.  Plus, what awesome leftovers!

 I sprinkled mine with this tasty goodness that really gives fish an amazing flavor. (According to the label- salt, sugar, "spices", granulated onion, granulated garlic, yellow mustard seeds, & paprika) It's all natural, MSG free, and kosher, which just add to its awesomeness.    If you can't find this seasoning, this recipe would be great with just salt and pepper, or a mixture of any dried spices.  (I would try to keep it within the typical Italian herbs though, since you'll be using a balsamic glaze.  Basil, oregano, garlic salt, etc.)


 We grilled our salmon tonight on a Weber to add a little bit of smokey summery flavor to it.  I'm sure there's a better way to grill fish than with tin foil covering the grate, but I don't have one handy.  Plus, it makes clean up a breeze, and you don't have to worry about the fish falling apart and ending up in your charcoal.  I just made sure to spray with foil with Pam, and cut slits in the tin foil so all that smokey goodness could seep through.

You can also bake the fish in the oven at 400 degrees for 8-10 minutes.  I would add just a bit of olive oil to the fish to keep it from drying out in the oven.

Whatever method you chose, you want to make sure that the fish flakes with a fork to be sure that it's done.  (I always cut a little slit in mine to check).


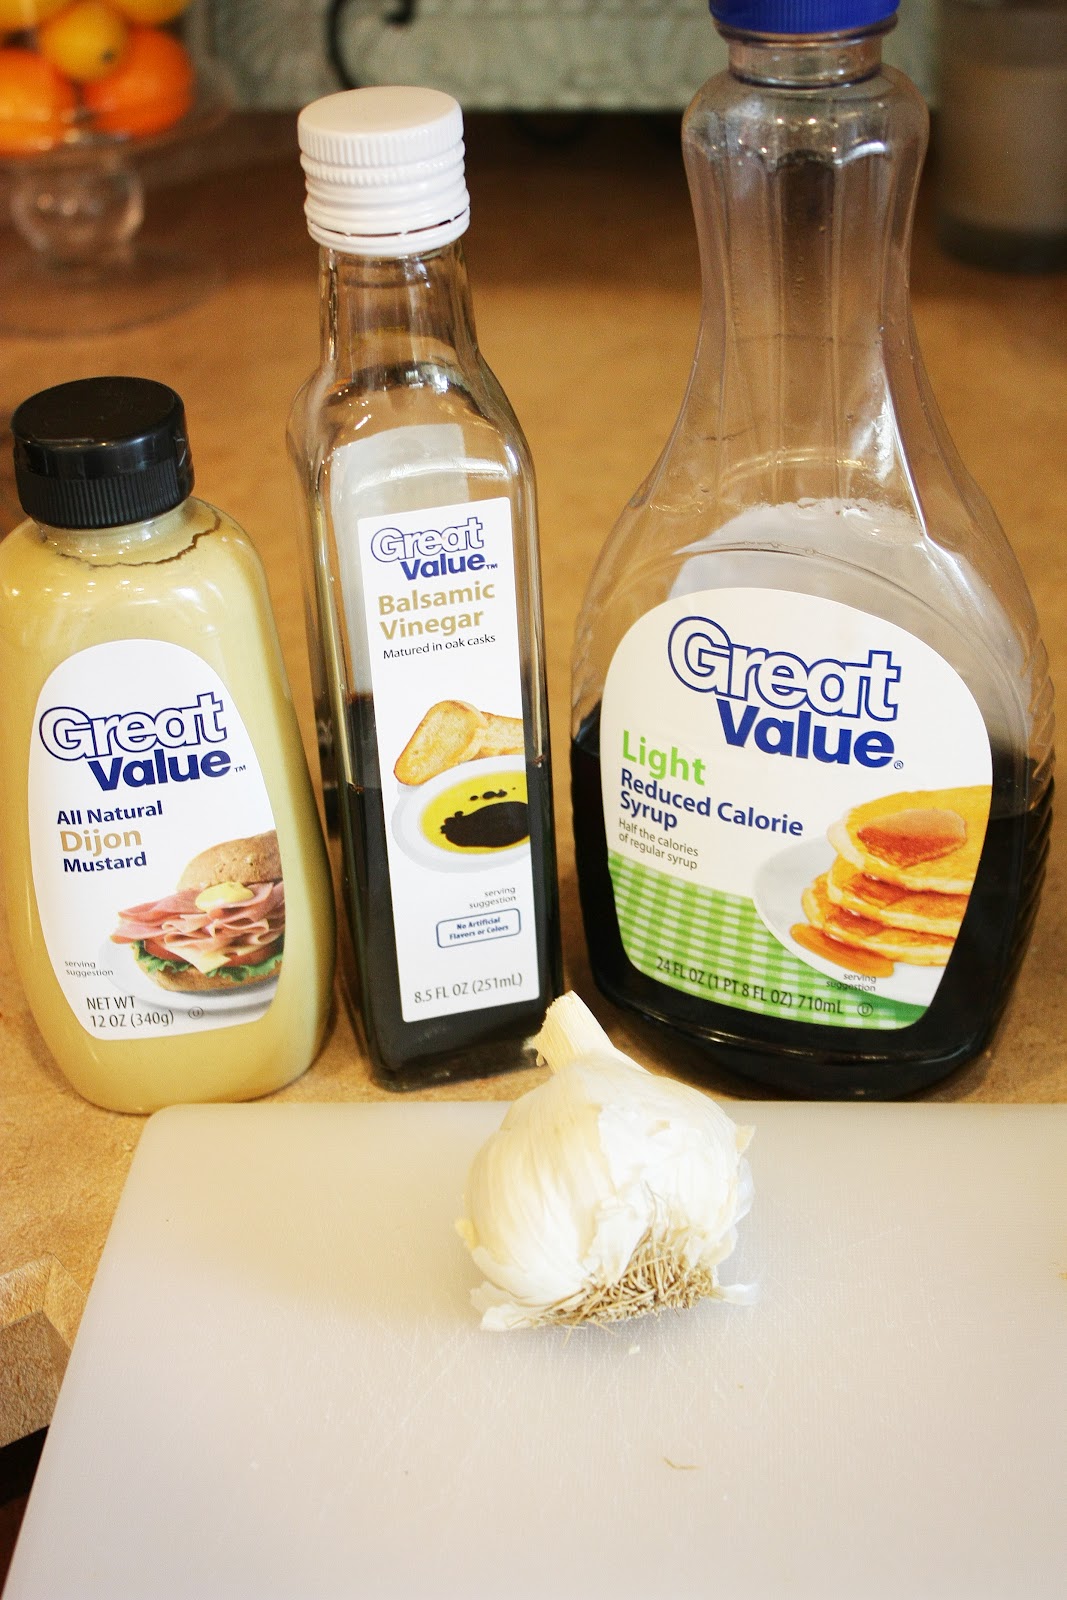
 While the fish was on the barbie, I made the balsamic glaze on the stovetop.  For this you'll need balsamic vinegar, dijon mustard, fresh garlic and maple syrup.


Add all these ingredients into a small saucepan and bring to a boil.  (Handy trick: spray your measuring spoon with a little Pam before adding something sticky, and it'll slide right off with no mess).

Once boiling, reduce heat to a simmer, and cook until thickened.  I ran a whisk through mine ever now and then to make sure nothing was sticking or burning to the bottom of my pan.


Slow and steady is the key to this glaze.  Mine took between 15-20 minutes, and at the end it was the consistency of a thick BBQ sauce.  It turned very dark (almost black), and reduced down a lot.  (Which is ok because a little of this packs a powerful punch.)  I had my hubby taste a little on a fork first before he doused his whole filet with sauce.

Drizzle reduced glaze onto thoroughly cooked salmon, and serve with your favorite side dish.

Since it was our 4th wedding anniversary, my hubby requested these with dinner (even over homemade), and I couldn't deny him:
They are surprisingly good, and not the least bit mushy.  We also had corn on the cob, which I couldn't deny these two a little nibble:
They turned into crack babies the instant they tasted the corn.  (Note the eye bulging and frantic expressions).

All in all, a fabulous summer meal!  Even fancy enough for an anniversary dinner in.  :)


Balsamic Glaze for Salmon

3/4 cup balsamic vinegar
2 tablespoons maple syrup
1 tablespoon dijon mustard
1 garlic clove chopped or finely minced

Combine all ingredients into a small saucepan and bring to a boil.  Once boiling, reduce heat and let ingredients simmer until thickened.  Pour small amount onto baked or grilled salmon.


Saturday, May 19, 2012

Easy Blueberry Lemon Pancakes

There's something about breakfast making the entire house smell good on a Saturday morning, and I'm all about easy ways to make that happen.  If you're a breakfast lover like I am, Bisquick may be a gal's best friend. It's inexpensive, quick and can be doctored up a million ways with whatever you have handy in the pantry.

Since Costco is one of the only decent places to get groceries here in Billings, I had enough blueberries in my fridge to feed an army.  Blueberry pancakes sounded goooood, and adding lemon sounded even better. These were finished before the coffee maker was done brewing, and the bright flavors were perfect for warm weather!

Get your grinder going and get your Folgers percolating, because these pancakes don't take long!

First I started with the recipe for basic pancakes on the side of the Heart Smart mix:


Stir Biquick mix, egg, and milk together in a bowl.  I used almond milk since we can't handle the moo juice at our house.  Plus, I think the almond milk adds a little something extra.

Next, you want to make the recipe awesome by adding a teaspoon of vanilla extract, the zest of one lemon, a few shakes of cinnamon (my hubby LOVES anything cinnamon, so you can alter this step if you'd like.  Add a little, add a lot, it's up to you.) and add about a cup of fresh blueberries.  I happen to like lots of fruit in my pancakes, so I probably added a little more.

I then used a 1/3 cup measuring cup to spread the batter onto a heated, greased griddle.

Normally, you flip pancakes when bubbles form in the batter and break at the top.  This didn't happen with these pancakes, so I flipped them when they started to puff up a look like this.  Usually you can tell when you slid a spatula underneath.  They should be nice and golden brown on the bottom and slide onto the spatula rather easily.
Try to get as much of the pancake onto the spatula as possible and make a quick flip.  Sometimes that doesn't always happen perfectly, and you end up with a broken pancake.  No worries though, I usually give the little broken pieces to these guys, who circle my feet like sharks while they are cooking:

Once flipped, you can typically tell the pancakes are done by checking the bottom for color, and I always like to press them a little with my spatula.  When they're done, they're kind of springy and resist pressure.  An uncooked pancake will kind of squish when pressed.  When in doubt, make a little cut into one of those bad boys and check the middle.  (More crevices for the syrup to leak into, in my opinion.)  The recipe on the box says that it will make 14 pancakes, but with the 1/3 cup portions, I got exactly 8.


While the pancakes are cooking, I made a quick blueberry lemon syrup.  I know there are ways to make this on the stovetop that are probably a lot more culinary, but we're talking Saturday morning pjs, and a general unwillingness to do anything that takes more than 10 minutes.  Plus, these pancakes were smelling oh-so-fine, and I'm impatient.

Depending on the number of pancakes you're making, and the amount of syrup you like on top, pour regular maple syrup into a microwave safe bowl. (1/4 to 1/2 cup is a good place to start)
Add fresh blueberries (I grabbed a handful and tossed 'em in.  Add a little, add a lot...you decide how intense you want the flavor to be), and a little bit of lemon zest.
Pop it in the microwave until the berries burst.  It took mine about a minute and a half, but I cooked it in 30 second intervals to make sure I didn't end up with a sticky mess in my microwave.

Pour steaming hot syrup on stacks of pancakes and enjoy!  We had ours with turkey bacon and Texas pecan coffee.  Fabulous way to start a summer Saturday!
Freeze these suckas, and pop them in the toaster on mornings where you need a quick breakfast.


Easy Blueberry Lemon Pancakes

2 cups Bisquick Heart Smart mix
1 1/4 cup milk (skim or almond)
1 egg
1 cup fresh blueberries
Zest of 1 lemon
1 tsp vanilla extract
Few shakes of cinnamon

1. Stir all ingredients together in large bowl.
2. Pour 1/3 cup portions onto heated, greased griddle.
3. Flip pancakes when bottoms are golden brown and bubbles have made batter puff.
4. Serve hot with dollop of butter and maple syrup.

Quick Blueberry Lemon Maple Syrup

1/2 cup maple syrup
handful of fresh blueberries
lemon zest

1. Combine all ingredients in microwave safe bowl.
2. Microwave in 30 second increments until syrup is hot and berries burst.

Adjust ingredient measurements for more or less servings.